Qwen2-7B-Instruct FastApi 部署调用
环境准备
本文基础环境如下:
----------------
ubuntu 22.04
python 3.10
cuda 12.1
pytorch 2.1.0
----------------本文默认学习者已安装好以上 Pytorch(cuda) 环境,如未安装请自行安装。
首先pip换源加速下载并安装依赖包
python -m pip install --upgrade pip
# 更换 pypi 源加速库的安装
pip config set global.index-url https://pypi.tuna.tsinghua.edu.cn/simple

pip install modelscope==1.16.1
pip install transformers==4.42.4
pip install fastapi==0.111.1
pip install uvicorn==0.30.3
pip install SentencePiece==0.2.0
pip install accelerate==0.33.0考虑到部分同学配置环境可能会遇到一些问题,我们在AutoDL平台准备了OpenELM的环境镜像,点击下方链接并直接创建Autodl实例即可。 https://www.codewithgpu.com/i/datawhalechina/self-llm/OpenELM-3B-Instruct
模型下载
使用 modelscope 命令行下载模型,参数model为模型名称,参数 local_dir 为模型的下载路径。 注:由于OpenELM使用的是Llama2的Tokenizer,所以我们在下载Llama2-7b时可将权重排除在外 打开终端输入以下命令下载模型和Tokenizer
modelscope download --model shakechen/Llama-2-7b-hf  --local_dir /root/autodl-tmp/Llama-2-7b-hf --exclude ".bin" "*.safetensors" "configuration.json"
modelscope download --model LLM-Research/OpenELM-3B-Instruct --local_dir /root/autodl-tmp/OpenELM-3B-Instruct代码准备
在 /root/autodl-tmp 路径下新建 api.py 文件并在其中输入以下内容,粘贴代码后请及时保存文件。 下面的代码有很详细的注释,大家如有不理解的地方,欢迎提出 issue。
from fastapi import FastAPI, Request
from transformers import AutoTokenizer, AutoModelForCausalLM, GenerationConfig
import uvicorn
import json
import datetime
import torch

# 设置设备参数
DEVICE = "cuda"  # 使用CUDA
DEVICE_ID = "0"  # CUDA设备ID,如果未设置则为空
CUDA_DEVICE = f"{DEVICE}:{DEVICE_ID}" if DEVICE_ID else DEVICE  # 组合CUDA设备信息

# 清理GPU内存函数
def torch_gc():
    if torch.cuda.is_available():  # 检查是否可用CUDA
        with torch.cuda.device(CUDA_DEVICE):  # 指定CUDA设备
            torch.cuda.empty_cache()  # 清空CUDA缓存
            torch.cuda.ipc_collect()  # 收集CUDA内存碎片

# 创建FastAPI应用
app = FastAPI()

# 处理POST请求的端点
@app.post("/")
async def create_item(request: Request):
    global model, tokenizer  # 声明全局变量以便在函数内部使用模型和分词器
    json_post_raw = await request.json()  # 获取POST请求的JSON数据
    json_post = json.dumps(json_post_raw)  # 将JSON数据转换为字符串
    json_post_list = json.loads(json_post)  # 将字符串转换为Python对象
    prompt = json_post_list.get('prompt')  # 获取请求中的提示

    # 调用模型进行对话生成
    model_inputs = tokenizer(prompt, add_special_tokens=True, return_tensors="pt")['input_ids'].cuda()
    generated_ids = model.generate(model_inputs, max_length=384)
    response = tokenizer.decode(generated_ids[0], skip_special_tokens=True)
    now = datetime.datetime.now()  # 获取当前时间
    time = now.strftime("%Y-%m-%d %H:%M:%S")  # 格式化时间为字符串
    # 构建响应JSON
    answer = {
        "response": response,
        "status": 200,
        "time": time
    }
    # 构建日志信息
    log = "[" + time + "] " + '", prompt:"' + prompt + '", response:"' + repr(response) + '"'
    print(log)  # 打印日志
    torch_gc()  # 执行GPU内存清理
    return answer  # 返回响应

# 主函数入口
if __name__ == '__main__':
    # 加载预训练的分词器和模型
    model_path = '/root/autodl-tmp/OpenELM-3B-Instruct'
    tokenizer_path = '/root/autodl-tmp/Llama-2-7b-hf'
    tokenizer = AutoTokenizer.from_pretrained(tokenizer_path, use_fast=False, trust_remote_code=True)
    model = AutoModelForCausalLM.from_pretrained(model_path, device_map="auto", torch_dtype=torch.bfloat16, trust_remote_code=True)

    # 启动FastAPI应用
    # 用6006端口可以将autodl的端口映射到本地,从而在本地使用api
uvicorn.run(app, host='0.0.0.0', port=6006, workers=1) # 在指定端口和主机上启动应用Api 部署
在终端输入以下命令启动api服务:
cd /root/autodl-tmp
python api.pypython /root/api.py加载完毕后出现如下信息说明成功。

默认部署在 6006 端口,通过 POST 方法进行调用,可以使用 curl 调用,如下所示:
curl -X POST "http://127.0.0.1:6006" \
     -H 'Content-Type: application/json' \
     -d '{"prompt": "Once upon a time there was"}'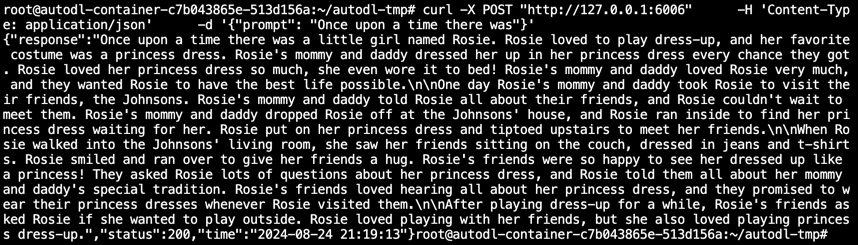
也可以使用 python 中的 requests 库进行调用,如下所示:
import requests
import json

def get_completion(prompt):
    headers = {'Content-Type': 'application/json'}
    data = {"prompt": prompt}
    response = requests.post(url='http://127.0.0.1:6006', headers=headers, data=json.dumps(data))
    print(json.dumps(response.json()))
    return response.json()['response']

if __name__ == '__main__':
response = get_completion('Once upon a time there was')得到的返回值如下所示:
{"response": "Once upon a time there was a little girl named Rosie. Rosie loved to play dress-up, and her favorite costume was a princess dress. Rosie's mommy and daddy dressed her up in her princess dress every chance they got. Rosie loved her princess dress so much, she even wore it to bed! Rosie's mommy and daddy loved Rosie very much, and they wanted Rosie to have the best life possible.\n\nOne day Rosie's mommy and daddy took Rosie to visit their friends, the Johnsons. Rosie's mommy and daddy told Rosie all about their friends, and Rosie couldn't wait to meet them. Rosie's mommy and daddy dropped Rosie off at the Johnsons' house, and Rosie ran inside to find her princess dress waiting for her. Rosie put on her princess dress and tiptoed upstairs to meet her friends.\n\nWhen Rosie walked into the Johnsons' living room, she saw her friends sitting on the couch, dressed in jeans and t-shirts. Rosie smiled and ran over to give her friends a hug. Rosie's friends were so happy to see her dressed up like a princess! They asked Rosie lots of questions about her princess dress, and Rosie told them all about her mommy and daddy's special tradition. Rosie's friends loved hearing all about her princess dress, and they promised to wear their princess dresses whenever Rosie visited them.\n\nAfter playing dress-up for a while, Rosie's friends asked Rosie if she wanted to play outside. Rosie loved playing with her friends, but she also loved playing princess dress-up.", "status": 200, "time": "2024-08-24 21:28:34"}OpenELM-3B-Instruct Lora 微调
本节我们简要介绍如何基于 transformers、peft 等框架,对 OpenELM-3B-Instruc 模型进行 Lora 微调。Lora 是一种高效微调方法,深入了解其原理可参见博客:知乎|深入浅出Lora。
环境准备
本文基础环境如下:
----------------
ubuntu 22.04
python 3.10
cuda 12.1
pytorch 2.1.0
----------------本文默认学习者已安装好以上 Pytorch(cuda) 环境,如未安装请自行安装。
首先pip换源加速下载并安装依赖包
python -m pip install --upgrade pip
# 更换 pypi 源加速库的安装
pip config set global.index-url https://pypi.tuna.tsinghua.edu.cn/simple

pip install modelscope==1.16.1
pip install transformers==4.42.4
pip install datasets==2.20.0
pip install peft==0.11.1
pip install fastapi==0.111.1
pip install uvicorn==0.30.3
pip install SentencePiece==0.2.0
pip install accelerate==0.33.0考虑到部分同学配置环境可能会遇到一些问题,我们在AutoDL平台准备了OpenELM的环境镜像,点击下方链接并直接创建Autodl实例即可。 https://www.codewithgpu.com/i/datawhalechina/self-llm/OpenELM-3B-Instruct
模型下载
使用 modelscope 命令行下载模型,参数model为模型名称,参数 local_dir 为模型的下载路径。 注:由于OpenELM使用的是Llama2的Tokenizer,所以我们在下载Llama2-7b时可将权重排除在外 打开终端输入以下命令下载模型和Tokenizer
modelscope download --model shakechen/Llama-2-7b-hf  --local_dir /root/autodl-tmp/Llama-2-7b-hf --exclude ".bin" "*.safetensors" "configuration.json"
modelscope download --model LLM-Research/OpenELM-3B-Instruct --local_dir /root/autodl-tmp/OpenELM-3B-Instruct指令集构建
LLM 的微调一般指指令微调过程。所谓指令微调,是说我们使用的微调数据形如:
{
    "instruction":"回答以下用户问题,仅输出答案。",
    "input":"1+1等于几?",
    "output":"2"
}其中,instruction 是用户指令,告知模型其需要完成的任务;input 是用户输入,是完成用户指令所必须的输入内容;output 是模型应该给出的输出。
数据集下载
我们使用alpaca-chinese-dataset作为我们的指令微调数据集 在终端打开/root/autodl-tmp目录输入以下命令下载数据集
cd /root/autodl-tmp
git clone https://mirror.ghproxy.com/https://github.com/open-chinese/alpaca-chinese-dataset数据格式化
Lora 训练的数据是需要经过格式化、编码之后再输入给模型进行训练的,如果是熟悉 PyTorch 模型训练流程的同学会知道,我们一般需要将输入文本编码为 input_ids,将输出文本编码为 labels,编码之后的结果都是多维的向量。我们首先定义一个预处理函数,这个函数用于对每一个样本,编码其输入、输出文本并返回一个编码后的字典:
def process_func(example):
    MAX_LENGTH = 384

    instruction = tokenizer(f"{example['en_instruction'] + example['en_input']}<sep>", add_special_tokens=True)
    response = tokenizer(f"{example['en_output']}", add_special_tokens=False)

    input_ids = instruction["input_ids"] + response["input_ids"] + [tokenizer.pad_token_id]
    attention_mask = instruction["attention_mask"] + response["attention_mask"] + [1]
    labels = [-100] * len(instruction["input_ids"]) + response["input_ids"] + [tokenizer.pad_token_id]


    if len(input_ids) > MAX_LENGTH:  # 做一个截断
        input_ids = input_ids[:MAX_LENGTH]
        attention_mask = attention_mask[:MAX_LENGTH]
        labels = labels[:MAX_LENGTH]
    return {
        "input_ids": input_ids,
        "attention_mask": attention_mask,
        "labels": labels
}加载tokenizer和半精度模型
模型以半精度形式加载,如果你的显卡比较新的话,可以用torch.bfolat形式加载。对于自定义的模型一定要指定trust_remote_code参数为True。
from peft import LoraConfig, TaskType, get_peft_model
import torch
from transformers import AutoTokenizer, AutoModelForCausalLM, DataCollatorForSeq2Seq, TrainingArguments, Trainer, GenerationConfig

tokenizer = AutoTokenizer.from_pretrained(
    '/root/autodl-tmp/Llama-2-7b-hf',
    trust_remote_code=True
)
tokenizer.pad_token = tokenizer.eos_token
model = AutoModelForCausalLM.from_pretrained(
    '/root/autodl-tmp/OpenELM-3B-Instruct',
    device_map="auto",
    torch_dtype=torch.bfloat16,
    trust_remote_code=True
)定义LoraConfig
LoraConfig这个类中可以设置很多参数,但主要的参数没多少,简单讲一讲,感兴趣的同学可以直接看源码。
task_type:模型类型
target_modules:需要训练的模型层的名字,主要就是attention部分的层,不同的模型对应的层的名字不同,可以传入数组,也可以字符串,也可以正则表达式。
r:lora的秩,具体可以看Lora原理
lora_alpha:Lora alaph,具体作用参见 Lora 原理
Lora的缩放是啥嘞?当然不是r(秩),这个缩放就是lora_alpha/r, 在这个LoraConfig中缩放就是1倍。
config = LoraConfig(
    task_type=TaskType.CAUSAL_LM,
    target_modules=['token_embeddings', "qkv_proj", "out_proj", "proj_1", "proj_2"],
    inference_mode=False,
    r=32, # Lora 秩
    lora_alpha=32, # Lora alaph,具体作用参见 Lora 原理
    lora_dropout=0.1 # Dropout 比例
)自定义 TrainingArguments 参数
TrainingArguments这个类的源码也介绍了每个参数的具体作用,当然大家可以来自行探索,这里就简单说几个常用的。
output_dir:模型的输出路径
per_device_train_batch_size:顾名思义 batch_size
gradient_accumulation_steps: 梯度累加,如果你的显存比较小,那可以把 batch_size 设置小一点,梯度累加增大一些。
logging_steps:多少步,输出一次log
num_train_epochs:顾名思义 epoch
gradient_checkpointing:梯度检查,这个一旦开启,模型就必须执行model.enable_input_require_grads(),这个原理大家可以自行探索,这里就不细说了。
args = TrainingArguments(
    output_dir="autodl-tmp/output/openelm_3B_lora",
    per_device_train_batch_size=8,
    gradient_accumulation_steps=4,
    logging_steps=100,
    num_train_epochs=0.87,  # 为了快速掩饰,我们训练到约1200个iter作为测试,建议设为10个epochs
    save_steps=600,
    learning_rate=1e-4,
    save_on_each_node=True,
    gradient_checkpointing=True
)使用 Trainer 训练
trainer = Trainer(
    model=peft_model,
    args=args,
    train_dataset=tokenized_id,
    data_collator=DataCollatorForSeq2Seq(tokenizer=tokenizer, padding=True),
)
trainer.train()加载 lora 权重推理
训练好了之后可以使用如下方式加载lora权重进行推理:
from peft import LoraConfig, TaskType, get_peft_model, PeftModel
from transformers import AutoModelForCausalLM, AutoTokenizer
import torch

mode_path = '/root/autodl-tmp/OpenELM-3B-Instruct'
lora_path = '/root/autodl-tmp/output/openelm_3B_lora/checkpoint-1200' # 这里改称你的 lora 输出对应 checkpoint 地址

# 加载tokenizer
tokenizer = AutoTokenizer.from_pretrained('/root/autodl-tmp/Llama-2-7b-hf', trust_remote_code=True)
# 加载模型
model = AutoModelForCausalLM.from_pretrained(mode_path, device_map="auto",torch_dtype=torch.bfloat16, trust_remote_code=True).eval()

# 加载lora权重
model = PeftModel.from_pretrained(model, model_id=lora_path)

prompt = "How to be a good learner?<sep>"
instruction = tokenizer(prompt, add_special_tokens=True, return_tensors="pt")

generated_ids = model.generate(instruction['input_ids'].cuda(), max_length=384)
print(tokenizer.decode(generated_ids[0], skip_special_tokens=True).split('<sep>')[-1])

'''
To be a good learner, it is important to be motivated, organized, and have a positive attitude.
Motivation is key to learning, as it helps to keep you focused and engaged. Organization is
important to ensure that you have the materials you need and that you are able to stay on track.
Finally, a positive attitude is essential to staying motivated and to help you stay focused on
the task at hand.
'''README
- 模型简介
OpenELM是由苹果公司开发的一款先进语言模型,通过一种新的层级缩放策略优化每个Transformer层的参数分配,从而提升模型的效率和准确性。OpenELM还提供了一个开放的训练和推理框架,包含数据集、训练日志和检查点等资源,支持研究的可重复性和透明性。
模型地址:https://huggingface.co/collections/apple/openelm-instruct-models-6619ad295d7ae9f868b759ca
项目地址:https://github.com/apple/corenet/tree/main/projects/openelm
官方报道:https://machinelearning.apple.com/research/openelm
论文链接:https://arxiv.org/abs/2404.14619
- 模型下载
OpenELM提供了Huggingface的模型格式,下载链接如下表所示:
| 模型 | 下载链接 |
| OpenELM-270M-Instruct | ModelScope | HuggingFace |
| OpenELM-450M-Instruct | ModelScope | HuggingFace |
| OpenELM-1_1B-Instruct | ModelScope | HuggingFace |
| OpenELM-3B-Instruct | ModelScope | HuggingFace |
- 教程简介
本教程以OpenELM-3B-Instruct为基础,介绍以下内容:
01-OpenELM-3B-Instruct FastApi 部署调用
02-OpenELM-3B-Instruct Lora 微调